I was drawing late one night and I happened to look over to my left at the table with my art supplies that sits next to my light table. My hand automatically goes over to the table and briefly glances at the type of pen I'm picking up but I never really looked at the table set up as a whole or in depth as to what I use mostly. My actual art supplies for the last ten years have mostly been the same. As all artists do, we pick out what we like and keep using it throughout our careers (as long as they keep making it) and I find myself sometimes apprehensive to trying something new. If something works for you, why change?
Over the years I've distilled a lot of my working process down to make it simpler and between the work being more digital than physical nowadays I have found myself using a real short list of items to draw with. I've been asked before what I use to draw so for those interested, here's the list with pics. From the first pic on top you can see that my regular tools only take up about a third of the table top in total.

1) PAPER - Mostly I've been using copy paper sized at 8.5" x 11" or the 11" x 17" size for bigger sketches (like comic book pages). Even my final art for Scooby-Doo (for the comic books at least) have been draw on normal copy paper. It's cheap and works well. Probably not great for the archival or collector mentality but it's the raw material to get a project done. I buy one box with reams of paper in it at Staples once a year or so for like $35. For the bigger paper, I buy a ream of it when I need it. I can burn through letterhead paper with roughs and thumbnails and if I screw up I grab another sheet real quick from underneath my light table where it sits and continue on.
For final art that I want to have a slick, professional look to it, and it may be a piece that I'll be selling later on, I use the Borden and Riley #234 Paris Bleedproof paper for pens. It comes it many sizes and prices can vary depending on where you buy it. I have ONE store in my area that carries it. Go figure. I like this particular kind of paper as it's light and thin, easy to work with on the light table, and also works extremely well with the pens that I ink with. I've rarely had any bad moments with the paper in terms of smudging and bleeding. Sometimes things happen but overall this paper works fantastic. It's been my "go-to" for many years. When I did comics I also would prefer to use this paper over the company's art board. The quality of paper is lacking of late there and I'd rather use my own. If I do a cover for Scooby-Doo for DC Comics, I'd use their art board as the people who buy original art like it on the "official" board. That is changing though as a lot of artists use what they like instead.

2) PENCILS - I can use anything really though I seem to gravitate to a 5H lead for breaking it down and keeping it clean and then a 2H or an HB to bring out the details. Depends on my mood. Sometimes I'll pull out a purple ColErase pencil or even a ball point pen and do the whole deal. At this creative point in drawing, it's about mood and getting it onto the page. You can tweak it later on with another piece of paper. If I do a convention or I'm on the road, I tend to use the 5H and HB.

3) ERASERS - I have three. A kneaded eraser, which is one that I use most often. You can bend and shape it to get into tiny corners and every artists uses one. You can't be an artist without one. Next is a Staedtler Mars Plastic Eraser, which is great for really cleaning up with as it leaves very little residue or crumbs and does in some cases a better job of overall cleaning than the kneaded eraser. My third eraser is a yellow gum eraser, which I use the least and it does a good job at times but leaves a lot of crumbs in its wake. The Staedtler Mars eraser is good for other things as well, such as when you take the price sticker off an item you bought and there is some sticky residue on the item left over. The gum eraser sometimes does the job but a Staedtler Mars one works superb at taking off the residue without hurting a book cover or toy box. A Sandford 'Magic Rub' eraser is great too!

4) MICRON PENS - My main stay for ten years now. I came to using these mostly after I had to trash a TON of Scooby and other work back in 2001 or so. I used to work with Le Pen, which was a superb pen marker that worked supremely well on Garde Silk paper which was very smooth. The Le Pen would glide across the paper and leave such a clean line that it almost gave the look that you did it digitally. It was great for style guide work as well where you needed strong clean lines that held up even when it was enlarged. But then you had the downside... All the work would fade from black to brown to light brown to almost invisible. It was great in terms of producing high quality work but the worst in creating original artwork that you wanted to be around in five years. It would in some cases start fading in one year depending on where you stored the original art. Hence, I lost a LOT of original artwork that I had to trash as it was faded and would be hard to sell. Live and learn.
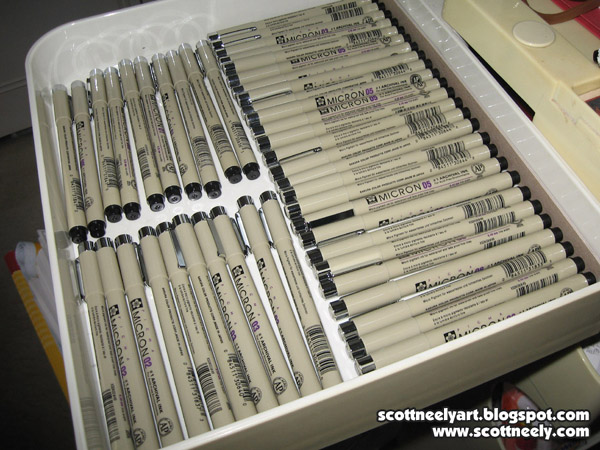
So I started using these Sakura Micron Pens in early 2002 or so and I've been using them ever since. The ink has never failed me nor faded over the years as they have archival ink in them. You can go through them though as keeping the points sharp can be a chore. I use the .005, .01. .02, .03. .05. and .08. I seem to use the .01 for fine work and the .08 for thicker lines most of the time. I use the others accordingly to what I'm doing. If I do a convention and I'm doing sketches there, I use these pens for doing a fast ink job over top of the pencil rough.

5) PITT BRUSH MARKER - My main inking tool for doing sketches, final art, and larger pieces for the last seven to eight years. The ink is solid and archival and the brush points while delicate leaves a nice strong line. It takes some skill and practice to use it right without destroying it. I usually use the frayed brushes that still have ink in them, but are no longer good for fine inking work, to fill in large solid black areas of a composition as well. Sakura who makes the Micron Pens also makes a brush called the Sakura Brush Pen and it's in the same tan colored container that the Microns come in. I used to use that brush mostly in the beginning. It has a finer point to it and takes a while longer to master. I'm not sure why I stopped using it and went with the PITT Brush Marker instead. It may have been because I like the shorter brush that the PITT had and it was easier to manuever around. I recently went back and tried the Sakura Brush Pen (as I still have a few boxes of them here) and it seemed like I was out of practice with holding and using it. It takes some time to go back and relearn to use something. They are still superb brush markers but I think my hand has grown comfortable with the PITT.
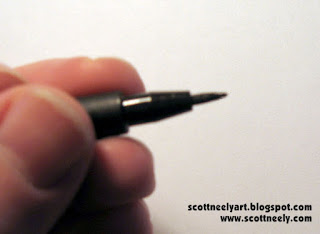

Also the PITT has an upside that the Sakura Brush Pens don't have. Once they become a bit frayed (and you'll know it when it happens) and don't give you the ink line you want you can take some tweezers and pull out the brush point from the pen tip and flip it around. As you can see from my pics, you have a perfectly good NEW point now to use by simply flipping the brush and sticking it back in. The hard part is leaving the right amount of brush length exposed though. The further out it is, the more control it takes to use. The further you stick it in, the tighter your control will be. So now you can get some extra usage from the pen before it gets moved to the pile where they are just used to filling in large black areas on a drawing.

Another trick is that you can twist the end cap off of the pen (sometimes it's hard to do!) and then drop a few drops of ink in from an eyedropper if the PITT Brush is dying on you. Now the only problem with this is that the ink doesn't match. This can be an issue for some but if you are doing convention sketches or roughs with it, it won't matter. I've not used India Ink in so many years that I can't tell you if it's still any good or not. Most artists I know complain about it being watered down or not black enough. Quality control is lacking with India Ink so you might be able to find something you like. At any rate, this is a good little trick to getting the most from your PITT Brush Marker before you have to throw it out.


BUY THE STUFF YOU LIKE IN QUANTITY - I only mention this as it's cheaper! If you buy them at three pens at a time, you are spending more money on them in the long run. I go to Dick Blick's Art Supplies on the Internet and buy them buy the box. The pens I use come 12 to a box and you can store them away. As you can see from the pics above, I keep extras close at hand on the right side of my light table in the first drawer of my artist's shelf. I lay them out according to size so that I know what I'm reaching for even when I'm not looking. When you have gaps that show up from pens dying out you know which ones to replace and which ones you use the most. You keep a bunch of them in stock so that you can keep working straight through. If you're on a deadline, it takes time out of your day to drive to an art store that carries them and you wind of paying more in some cases. The price for the Microns that I see at most art stores is $2.69 a pen so that adds up. If you buy them in bulk you can get them for less than $2.00 if they are having a sale as well. I buy more of the .08 Micron Pens than I do the others since I tend to use them for quite a lot of things.


6) RULER - My little plastic ruler has been with me for ten years at least! It was cheap and did the job. It was clear plastic as well so it makes working with easier. The downside is that it had no lip or inking edge to it so if you ran a brush or marker next to it chances are you'd create a smudge when you pulled the ruler away. This happened a lot and so I got the idea of raising it off the paper by taking a piece of thin cardboard and cutting it so that it fit underneath the ruler and left an inking edge on both sides. I added a little piece of tape to hold it into place on either end of the ruler and it's been my "go-to" ruler for a decade. I sometimes replace it when I run an X-acto blade next to it and the blade accidently cuts into the plastic and creates a slightly off line. They are cheap and easy to replace. I have other rulers here that I use but this little one is the one I use the most. I think they cost like .49 cents. I do have two other big rulers that I use for doing longer lines naturally but this little one gets me through all the details!

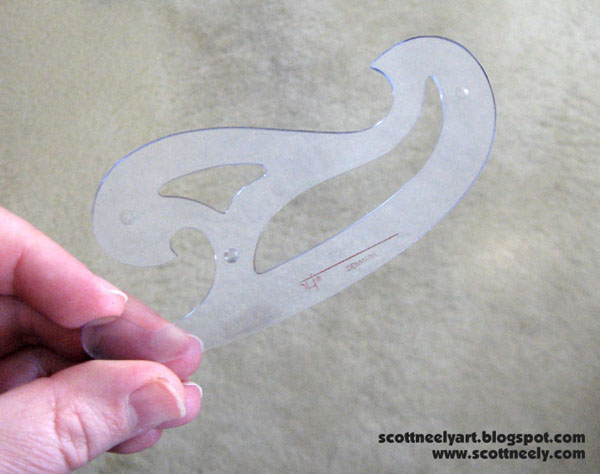
7) FRENCH CURVES - Ah, the tool of the Jedi. If you are well trained in using a French curve they will serve you well, young padawan. I have many here of different shapes and sizes but I use basically three different ones. One of them (pictured above) has an inking edge built in. If you can buy them this way, make sure you do. It makes life easier! Otherwise...
You have this kind of French curve where I had to do the same thing that I did to my ruler and tape some cardboard to the bottom of it to raise it up off the paper. I use the outer edges mostly for bigger stuff so it's looked like this for ten years too! It's my second "most used" French curve.

And the third is my little worn and faded French curve. It's been with me now for over 20 years or longer and we've been through many jobs over the years together. I got it back when I was in high school when I was taking mechanical drawing. It has never failed me and I take it, my ruler, Micron Pens, and PITT Brush Markers to conventions. My little tackle box of supplies. We've seen many a battle and it has never failed me. My tried and true. I've used it so much over the years that it's like a swiss pocket knife for me in terms of working. I use a side here and a curve there, and a little piece here and there. You learn wield it like a blade and you know how to use it. It's why it sits on my table where it does. I have not bought another one so I have no idea what these small ones cost.
This, of course, is all based on my years of doing art and what I feel most comfortable drawing with to get the best results. It's up to you to try and experiment with the many supplies out there to see what works for you! Buy the supplies that feel good in your hand and give you the best results... and then buy a lot of it in case they stop making it!


2 comments:
Great post Scott! Looks like a majority of folks use the Pigma Microns and Faber Castell Pitt pens. Being a "wannabe" cartoonist I have tried just about every pen I could get my hands on. I agree with the, if something works why change is it rule. I have bought and used pens that were supposed to be waterproof, only to find that with one swipe of a watercolor brush that the ink starts to bleed.
David,
The reason most seem to use these same supplies I think it due to them drying quickly as you draw with them. Many pens, to even the traditional brush and dipping it in india ink, sometimes take a while to dry properly and you have to wait a bit before you touch them. I've used many a brush and had the side of my hand accidently smudge my line ruining the art and forcing me to use white paint to fix it.
Post a Comment